DomestiKatedLife

A Boston-Based Lifestyle Blog

Apple Recipe Round-Up.

It’s National Apple Month — the perfect time for apple picking, and then of course the perfect time for baking and cooking with apples! I realize I have quite the arsenal of apple recipes from this fall and previous seasons, so I thought I’d round-up my favorites to give you some inspiration for what to make with all of your bounty from apple-picking this autumn. Check out the full list below!
mac-and-cheese-baked-apple5

apple toffee hand pie 2dsc_0012

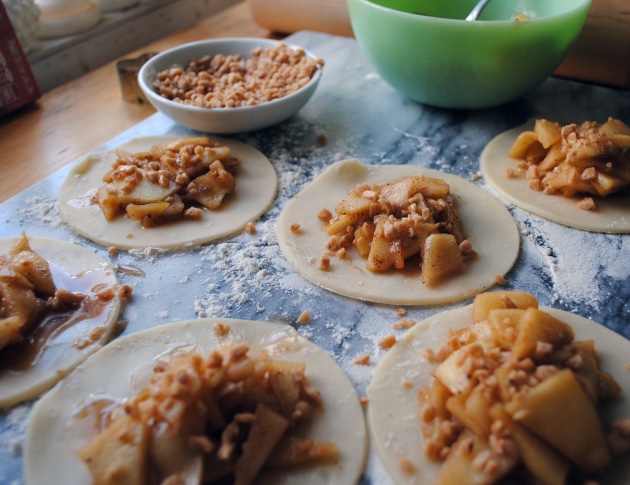
Green Apple Toffee Pie-lets.

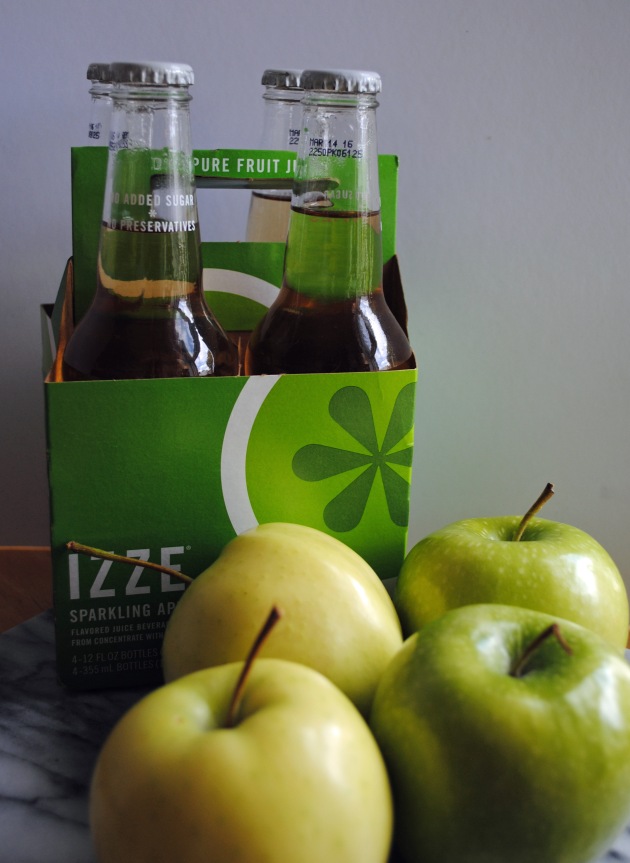
Feel that crisp, cool air? Feels like fall is here! I know everyone gets all pouty that summer is coming to an end, but not me. Bring on the boots and jeans and cozy sweaters, and most of all: bring on the apple picking and the baking! I got the baking bug this weekend and was inspired to test out a recipe inspired by IZZE’s sparkling apple flavor — a flavor full of that perfect green-apple tartness. The result? A mini apple-toffee “pie-let” — the name my husband dubbed this sweet treats when he saw them cooling on the counter. Full recipe below: apple toffee hand pie 5apple toffee hand pie 3apple toffee hand pie 2apple toffee hand pie 4apple toffee hand pie 4bapple toffee hand pie 6apple toffee hand pie 1Ingredients: 

  • Pie dough (use this recipe to make your own, or if you’re in a pinch, store-made works too!)
  • 3-4 Green Apples (Granny Smith works great!)
  • 1 tbsp butter
  • 1 tsp of brown sugar
  • 1 tsp of granulated sugar
  • 1/2 tsp of cinnamon
  • 1/2 tsp of nutmeg
  • Pinch of sea salt
  • Chopped toffee bites (you can get pre-chopped Heath Bar in the baking aisle)
  • Egg white wash

Instructions:

  • Pre-heat oven to 400 degrees.
  • Peel and thinly slice apples, add to a small saucepan with butter, sugars, spices and a pinch of sea salt.
  • Let the apple mixture combine over medium heat until apples just begin to soften. Set aside and cool.
  • Roll out pie dough on a floured surface (my marble pastry board is awesome for this — find a cheap one here!) and use a glass or bowl to cut out 5″ circles.
  • Place about 2 tbsp of apple mixture in center of pie circles, leaving 1″ diameter around the edge, repeat with half of the remaining pie pieces.
  • Top all of the pie bottoms with sprinkled toffee bits, and then add second piece of pie rounds to the top (consider cutting out a cute shape at the top for decoration).
  • Seal the edges of the top and bottom crusts by rolling the edges in and crimping with your fingers or a fork.
  • Sprinkle with more toffee bits and using a pastry brush, brush on egg white wash.
  • Bake at 400 degrees for 20 minutes, serve while warm with IZZE Sparkling Apple.

Travel Photo Books. 

I posted last week about some of my tips for planning an instagram-worthy vacation, but I  have to admit that I’m guilty of keeping all of those vacation pictures and on my phone and camera long after we return home. Remember the good old days when you couldn’t wait to run out to the photo store and get your film processed from vacation? With the instant gratification of digital photography, I rarely actually print out images anymore, they end up just living online. Snapfish offered to let me try out their new website and travel photo books to help me put an end to all of my vacation pictures staying on my iPhone.

I had a ton of fun going through images from two of my favorite trips: our West Texas road trip through Austin, Big Bend, and Marfa, and our cross-country honeymoon road trip.  I had actually printed out tons of images from our honeymoon, and saved them in a big folder with postcards and ephemera that I picked up at each stop along the way. I had grand plans of putting this all in a scrapbook, but that plan never came fruition. So I sat down one recent weekend and scanned all of the postcards, tickets, coasters, matchbooks — you name it — into digital files and uploaded them to the Snapfish photo book tool to create a really gorgeous, printed book of our all of our memories from the trip.


Interested in creating your own Snapfish Travel Book? I’m giving away travel books just like these to two lucky readers! Just comment below and let me know what you’d put in your photo book to enter to win! US residents only. Winner will be chosen on 9/15.

In the meantime, learn more about becoming a Snapfish Superfan! 

This post was created in partnership with Snapfish. All opinions are my own.

#Domestikatetravels Tips For Planning An Awesome Vacation.

Let me let you in on a little secret: I love the process of planning a trip almost more than I do going on the actual trip. It’s like a sport for me — finding the hidden gems in a new city, organizing our days to maximize all of the different neighborhoods I want to explore, and collecting as many recommendations as I can before we leave about what I *must* eat or drink in our destination city. We have taken some pretty amazing trips over the past few years that lead to awesome adventures (check out our travels to Austin + Marfa, Nashville, and our cross-country honeymoon road trip for a few examples!). Someone commented on one my instagram posts last week and asked how we go about planning for these fun little getaways, and it dawned on me that I actually do have a pretty standard process that I thought I’d share here today, check out my tips for note to plan awesome getaways:  

    1. Gather Your Travel Books. Whenever we book a trip, my first planning task is to take a look at the New York Times 36 Hours books. They’re great resources to find boutique hotels, and an give you a good idea of which neighborhoods will be worth visiting. I like that they pick a few traditional ‘tourist’ spots but mix them in with off-the-beaten-path recommendations. My other favorite travel books are the WildSam Field Guides. I’ve been lucky that the last few cities we’ve picked have had them (Austin, Nashville, and an upcoming New Orleans trip!). These are the kinds of recommendations you’re going to get from your cool hipster cousin, if you had a cool hipster cousin that lived in the city that you’re visiting. I also really enjoy that they include some history and stories of interesting locals, it’s a good way to get the vibe of the city before you arrive.
    2. Explore Hashtags. If you want to see the cool things that other people are finding in the cities that you’re visiting, check out what they’re sharing on instagram with local hashtags. Look for common hashtag prefixes like #igers + the city name or #visit + the city name to explore what locals or other visitors are taking images of. I also like to check out a local blogger hashtag too, when people visit Boston I’d recommend they look at our #bostonbloggers hashtag to see what influencers are eating, visiting, doing and come up with ideas using their feeds as inspiration. I also love to check out the great instagram feed @withthelocals for interesting recommendations — they add a new city each week so you can find lots of great details on an area from someone who actually lives there!
    3. Read Up Online. There are a few non-traditional sites I also like to use for trip planing. Design*Sponge and The Everygirl offer great city guides on their sites. People often share travel ideas on destination specific Pinterest boards, so I search those as well. And Yelp forums can be super helpful for reading through ‘best of’ debates — like where the best bbq joint is in Nashville, or where the best tacos are in Austin.
    4. Build a Map. I hope if you take one thing away from this post, it’s this helpful travel tip! Did you know you can build your own customized map on Google Maps? When we take trip I usually make a long list of all of the restaurants, bars, shops, and what my husband refers to as ‘instagram locations’ around the city and then add their locations to a google map. Each time you drop a new pin on the map you can start to see where there are clusters of things to do and see. I find this really helpful, especially for shorter trips where you’re trying to fit a lot in, to organize your days and hit up several spots in one area. I also like to use this ‘map’ phase of planning to take a look at surrounding areas outside the city for fun things to do. When we were in Austin we decided to spend a few days driving out to Big Bend National Park and Marfa, because it was probably one of the only times we’d end up being that close to those pretty obscure (but amazing!) locations in the country.
    5. Ask with locals. This is something I do while planning the trip, and once I’m there. I’ve been lucky to make some great virtual-friends from blogging, and get the best recommendations of things to do and see when I either reach out and email local contacts from the city I’m visiting, or put an open call up to readers or followers on social media. Sometimes we’ve even rerouted our plans while we’re on vacation because a follower has recommended something to me on the fly. Reach out to your favorite bloggers and ask them! I have a long list of Boston recommendations that I always happily send out when people reach out to me. The same goes with trusting the locals once you’re actually on your trip. Talk to the bartenders, the waitresses, the bell-hop and the cab drivers. When we were in Nashville we got the best recommendations for interesting bars to go to from a bartender we met the first afternoon we were there — people love to tell visitors what is special about their city, you just have to ask!

So, any great travel planning tips to add to this list? I’d love to hear your ideas! (PS: I’m going to follow rule #5… any New Orleans readers out there? We’re planning a trip in the fall and would love to know your must see/do/eat/drink list!)

Jalapeño Cheddar Spinach Dip. 

I’ve got a recipe for you today that’s a little bit cheesy, a little bit spicy, and is served in a crispy, carb-y, delicious bread bowl made from La Brea Bakery’s jalapeño cheddar bread. So you know, you’re welcome. The bread itself was the inspiration for the recipe, jalapeño and cheddar are a winning combination in my book! I used those flavors to update a classic baked spinach dip for a savory appetizer with a little bit of a kick. And if you’re not ready for a piping-hot dip just yet, you can refrigerate it and serve it cold too, I tested it both ways and they’re equally delicious. Recipe below!


Ingredients:

  • La Brea Bakery’s Jalapeño Cheddar Bread
  • 8 oz Cream cheese
  • 1 C Sour cream
  • 3 Tbsp Mayonaise
  • 2 Tbsp Worcestershire sauce
  • 1.5 C Shredded sharp cheddar cheese
  • 2 C Spinach (packed)
  • 1/2 C Scallions, plus extra for garnishing
  • Jalapeño
  • Carrot and celery sticks for serving

Recipe:

  • Pre-heat oven to 400 degrees.
  • Combine Cream cheese, sour cream, mayonnaise, Worcestershire sauce and cheddar cheese in a food processor and blend until fully combined. Remove and set aside in a bowl.
  • In the food processor, combine spinach, scallions and jalapeño (use between one half and one whole jalapeño, depending on your desired spice level). blend until fully combined and add to cream cheese mixture.
  • Fold together cream cheese and spinach mixtures to combine.
  • Using a bread knife, hollow out the top of the jalapeño cheddar loaf bread, saving the inside bread for dipping.
  • Fill the bread bowl with dip mixture and bake at 400 degrees for 20 minutes, or until top of dip begins to turn a golden brown.
  • Garnish with extra scallions and jalapeños, and serve with carrot sticks, celery, and additional bread cubes.

Interested in trying out this jalapeño bread and more La Brea Bakery’s bread products? La Brea Bakery’s Breaking Bread Tour is coming to Boston September 19-20, visit BreakingBreadTour.com for more info and to find our about the tour stops.

Please note: this post was sponsored by La Brea Bakery, but all opinions, images, ideas, and recipes are my own. 

Pop Fizz Peach. 

This hot, steamy, humid weekend called for a serious cool-down concoction. I’ve seen this idea of adding popsicles to cocktails on Pinterest before, and this felt like the perfect time to try it out. In a wine glass I muddled a few mint leaves and sliced peaches,  poured in some chilled vodka, and topped off the glass with half an IZZE sparkling peach. Then for the finishing touch, a peach popsicle dunked in to keep things cool! And the best part is that you get to snack on the popsicle while you enjoy your drink! Cheers! 
   Please Note: This post was sponsored by Izze; all images, ideas and content are my own. 

Jalapeño Watermelon Margaritas.

A trip to Texas this past spring turned me on to jalapeño margaritas, and a recent dinner at Besito put watermelon margaritas on my mind.  When Breville sent me one of their powerful blenders to try I thought this was the perfect time to combine the two! It’s got the tang of lime, the heat from the jalepeno-infused tequila, sweetness from a bit of agave, and the pureed watermelon gives you a majorly refreshing taste. I blended up a big batch, which was helpful since they were so tasty they disappeared fast. Now, the real question is, how have I lived this long without a blender in my life? Full recipe for your own summer-cocktail enjoyment below! 


Ingredients:

  • 1/3-1/2 Cups of Jalapeño-infused Tequila
  • 3 Cups small-cubed Watermelon
  • 4-5 Cups of Ice
  • 1/3 Cup of Lime Juice
  • 1 Tbsp of Agave

Recipe:

  • Infuse tequila the night before, slice one jalapeño and leave it a bottle of tequila overnight.
  • Combine all ingredients and blend for 60 seconds.
  • Pour into 4 glasses and garnish with slices of jalapeño, lime and watermelon!

Please note: Breville has provided me with a complimentary blender. All opinions, recipes, and images are my own. 

12 Hours in Maine.

We have been so busy this summer with weddings,  house hunting, and family events so we took a little one-day ‘vacation’ trip up to Maine this weekend with one thing on the agenda: eat lobster rolls. Our first stop was in Wiscasset to try Red’s Eats, whose claim to fame is that they put more than a full lobster on their rolls. The roll was pretty tasty and the portions were not over-exaggerated. While we were in Wiscasset we popped into a few shops and I scooped up an healthy amount of fresh washi tape and paper goods at Rock Paper Scissor. Stop two was at Waterman’s Beach Lobster for lobster roll#2, which they serve on a hamburger bun! The lobster roll was great, but the real draw here is the amazing view and rhubarb pie that knocked my socks off (okay, maybe knocked my sandals off?). I’m going to have food-dreams about that thick, buttery, flakey pie crust. We  ended the day up in Camden, ME with cocktails from Pig + Poet  on the porch of White Hall — which was a pretty magnificent cap off to a perfect summer day! 


Veggie Dip Bowls with Alouette.

They say a party with out cake is just a meeting. Well, I say a party without appetizers fits the same criteria. Even if I’m just having a few people over for casual drinks, I almost always make two things: a cheese plate and a small crudité platter. I always feel like I’m being super healthy when I make a veggie and dip tray, but let’s be honest — vegetables are only there as vehicles to get the most amount of dip possible in my mouth — real talk people! Alouette Cheese sent me some of their new Le Bon Dips to try and I attempted a little stylists’ trick to make my crudité look extra appealing: I made a dip bowl out of veggies!

You can try this trick at home, it’s very simple. Start with a small head of raddichio, purple cabbage, or savoy cabbage (or get creative with other vegetables! Slice a small sliver off the bottom of the head of cabbage so that it can sit flat without rolling. Then slice the top inch or so off the top of the head to form the bowl shape. Next you have to hollow it out, using a sharp knife at an angle, slice what should be a cone-shaped hole out of the center of the head, leaving about half an inch of a bowl border around the edges. Use a smaller paring knife to cut away pieces from the inside and keep removing the insides until you have a bowl that works for your plate. Then fill that veggie bowl up with your favorite dip! I tried the Alouette Le Bon Dip in fire roasted vegetable and basil, zucchini, parmesan — try adding a few fresh herbs to the top of the dip before you serve it for a special touch!


Please note: This post was sponsored by Alouette Cheese, all opinions, ideas, recipes and photography are my own.

A Sparkling Spritzer.

Guys, let’s talk about wine spritzers — why does this drink get such a bad rap? I have to start this blog post with a shout out to my brother-in-law who inadvertently inspired this idea. Sometime last summer we asked him to whip us up a drink at a family party, and maybe-sort-of-jokingly he told us he was going to make us wine spritzer. We giggled when he actually made them and brought them over to us, but guess what? They were really delicious. They can be light, crisp, and fruity — which are some of the most basic tenants of a good summer cocktail option. Plus they have a great name! A spritzer just sounds refreshing, doesn’t it? I decided to take a stand and stick up for the poor little wine spritzer and make one of my own with mixed fruits and IZZE sparkling waters:

  • Step 1: Fill a stemless wineglass or tumbler with ice and mixed fruit of your choice.
  • Step 2: Fill the glass 1/2 to 2/3 full with a fruity, light white wine.
  • Step 3: Top with a flavored sparkling water (I love the Mandarin Lime IZZE flavor!)
  • Step 4: Clink! Times to cheers glasses with friends and enjoy a summer evening outside.

izze spritzer 2 izze spritzer 3 izze spritzer 4 izze spritzer 5 izze spritzer 6

Please Note: This post was sponsored by Izze; all images, ideas and content are my own.